4. Cooking workshop series

In black color the steps for fulfilling the goals of each workshop.

In red color the games for group building, icebreakers, group forming.

In blue color suggested ways to do the actual work.

In green color the theoretical part

In violet color the games to introduce participants to the digital story telling stage.

4.1 Session 1

The overall goals of the 4th session are:

• Group bonding by creating a feeling of security, mutual respect and understanding in a joyful way allowing personal information to be shared.

• Enable participants to value and share their food culture (and nutritional habits) and learn about the food culture (and nutrition) in their new places/countries by integrating it in a new multicultural environment.

• Quoting the historical, geographical (climate, cultivations etc.) and social facts that create both diversities and similarities.

• Pinpointing the specific differences that create the biggest difficulty in adjustment, in order to accomplish mutual understanding and acceptance.

• Definition of what we consider to be “good” and healthy, nutritionally, emotionally and mentally.

Introductions, ice breakers and group agreement
It is very important to consider the group of participants as a small community of humans, and to adapt the introductions and the icebreaker activities to the specific composition of the group, in order to encourage participation and sharing instead of competition.

The facilitator does not encourage competition of any kind or winning groups so the games one chooses to use should be appropriately adjusted.

Candy Introduction
Candy Introductions is a get-to-know-you game that helps people learn new facts about each other in an easy way. They select various pieces of candy from a bag, and each candy variety is associated with a fact about themselves which they will introduce to the others.

Candy Introductions can work with any group size. The icebreaker works best when the group size is limited to 12. Materials required are: candy with about five different variations (color or candy type), and an optional chalkboard/whiteboard.

Setup for candy introductions

Purchase several variety packs of candy, enough for each person to be able to have at least five pieces. They can be any candy type, but not too many choices (limit it to around five or six different varieties). Alternatively, buy any candy that already has a variety of colors.

Instructions on how to play

Pass around the candy and tell each participant to choose anywhere from one to five pieces of anything that they want. However, instruct them not to eat it yet. After they have chosen their candy, tell them what each candy type/color represents.

Write on the board the following. The colors mentioned are just an example:
• Red – Favorite hobbies
• Green – Favorite place on earth
• Blue – Favorite dish • Yellow – Dream job
• Orange – Wildcard (tell anything about yourself!)

If you don’t have the above colors, change the above to match the candy types that you have. Each person takes turns introducing himself or herself, beginning with their name and then saying one fact for each candy type that they have. Then each person says the name of the persons sitting beside him or her. Other useful icebreakers can be found here: Getting to know you

Group agreement

Spend some time to create a group agreement. Once the participants merge into a single group with the shared-experience of the icebreakers, it is the time to fix the rules of this specific group. Group agreements represent the structural and functional basis for a proper and safe group-work session. The most important questions to be answered are:

• What things would make this group/workshop work well for you?
• What makes this a safe and respectful place for us to work in?
• What would make this group a good space for learning?

This following link provides some useful ideas and ways on how to create a group agreement.

Proposed Group Agreement

On the basis of our experiences, the following points represent some substantial propositions which need to be clarified within the group agreement:

• make sure everyone is able to contribute
• more talkative people: show a little restraint
• quieter people: your contributions are very welcome
• only one person speaks at a time – put up your hand if you want to speak and wait for your turn
• respect each other’s opinions even / especially if you do not agree with them
• apart from respecting each other, also respect the role of the facilitator in keeping everyone involved and keeping a sense of timing/schedule
• participate!
• confidentiality – some things should not be repeated outside of this meeting
• be conscious of time – help stick to it, or negotiate for more
• mobile phones off to minimise disruptions
• regular breaks

More information on participatory methods and ideas can be found at http://www.participatorymethods.org/methods

Record the countries of origin of all participants.

This can be part of the presentation or by using a map.

It can also be done by playing a card game using pictures of famous sights of each country. We mix the pictures and we give one picture to each participant face down asking them to find where the site is located.

The facilitator has to study the cuisines of the participants’ countries.

He/she must have the knowledge of the main characteristics of each country, preferences in raw materials, the cooking ways and eating habits. He/she needs this knowledge in order to fulfil the goals of the workshop.

Historical, geographical, and religious reasons are studied in a way that helps them understand each cuisine. The facilitator has to be aware of the main differences and similarities, the “philosophy of the cooking preparations”, and the essence of each culinary tradition. There are many 30 articles online, so it is possible to choose the most appropriate ones according to the amount of time available.

It would be helpful if the facilitator made a chart about each cuisine as a basis where information provided by the group can be added to.

Participants are invited to describe to a “stranger” what they feel to be the essence of the cuisine of their country of origin. Work in pairs and then in groups of about four.

Each group presents the outcome of their discussion and the facilitator helps them to do so in a coherent and clear way. On the board they make the first notes about the characteristics mentioned.

This session can be divided in two at this point
because there are many topics to be covered.

The first meeting can be closed after each group completes the presentation.

If the facilitator decides to do so, the next meeting can start with a game that allows more information to be shared about each individual (grouping) before we continue to the topics to be covered.

Baking bread can be used as an icebreaker.

Continue working in the same small groups.

Baking bread is a great starting point (even with a breadmaker machine).

A breadmaker machine is the most practical way as often ovens are not available.

• Participants discuss types of bread from their own country/place of origin.
• Learn the related language to understand the ingredients, the preparation methods and the baking/cooking of the bread.
• Discuss the cost of making bread vs buying bread.
• How can the basic bread recipe be varied – to make it more traditional/healthy?

Is there a recipe which includes everyone’s ideas that works?

Explore eating habits in a systematic way in the groups and then all together. Give to the groups or write on the board the subjects to be discussed. This helps control the time spent and have more focused results.
• Meals,
• How do we lay the table,
• Food sharing,
• Food combinations,
• Gender roles,
• Shopping e.g. super market, local street markets, local farms etc.

The new data are added to the notes on the board.
At this point, do not talk about which food combinations are considered to be more healthy than others. Pay attention to handling the information on the gender roles and highlight the diversities. Discuss if the participants feel the need to adjust to the western gender roles and why. Be careful to keep the discussion focused on food.

Focus on similarities and diversities.

Do that using the notes on the board. Discuss all together which are the diversities that create the biggest difficulty in adjustment, in order to accomplish mutual understanding and acceptance.

Choose which of the “differences” would be good to maintain and be adopted by all. Attitudes that could help change the nutritional approach of all the group members regardless of origin.

For example, people coming from Africa or the Middle East are usually more used to eating fruits and vegetables rather than the processed food westerners are increasingly eating. They are also more used to cooking and sharing their meals all together.

Cooking and eating habits they often abandon in order to feel more accepted by the locals. Usually this is done by their children when they start going to school as they copy the eating habits of their local classmates.

The definition of what we consider to be “good” and healthy, nutritionally, emotionally and mentally, also takes into account the economic factor. Further information on healthy eating habits can be found in the appendixes.

Talk about the general directions, the “philosophy of the cooking preparations” that define each culinary tradition.

Historical, geographical, and religious reasons are taken into account.

The facilitator makes clear that each dish is really a journey into time reflecting the climate, the history of a place and the social class the recipe comes from.

This means, as it is already mentioned, that the facilitators are already very well prepared.

The information comes from the participants with the guidance of the facilitators. One way this can be done is to hand out one traditional recipe to each group (different recipes can be used from the different traditional cuisines) and ask the participants to “discover’.

-The why of the cooking method chosen (e.g. sautéing, frying, boiling), the selection of raw materials.

-Is it a rural dish or does it come from an urban environment?

-What influences has the recipe integrated?

Historical, economical, geographical, religious reasons are taken into account.

4.2 Session 2

The overall goals of the 2nd session are:

• Obtain information which will help the facilitation of the workshop by allowing the facilitators to fulfill the needs of the participants they are working with

• Help the participants share their experiences and skills

• Develop affordable, tasty and nutritious menus and meals

• Take the best of local and seasonal produce

• Suggest alternatives for ingredients not easily sourced in the new community or help to grow alternatives

• Increase health levels by fostering a healthier diet that will protect them from diseases related to malnutrition

• Gain basic skills in nutritional diet and home economics

• As language might be an issue, it is important to embed language learning by learning the words of raw materials and basic culinary terminology

In order to facilitate the mutual knowledge, the group is conducted to play a game that allows more information to be shared about each individual (grouping). The game written below is played in a circle with all the participants and not in small groups.

Name Memory game (ice-breaker)

This game usually works well with younger participants. All members of the circle present themselves and each one adds one piece of information to their name that they are willing to share or thinks is particularly characteristic of their personality. (It can be an adjective put before the name). The person sitting next to them repeats the name and the information, then does the same. The next participant has to repeat the first two names and characteristics, then add their own name and characteristic information, and so on, until the last member has to repeat all the names and information connected to them.

Example:

John says: “Your name is Mary and you like hiking, you are Peter and you play tennis, Katie, you like dressing up in funny clothes, and I’m John and I hate spiders.”

The game is based on the method developed by “i-DIGital Stories – Stories Educational Learning Facilities” project, with the financial assistance of the Erasmus + program of the European Commission

Create small groups of about 3 – 4 using a game

All work during the workshop is done in the small groups and then presented to all.

Salty/Spicy/Sweet/Sour

Using food is always fun for the participants. As individuals we like different tastes, and there are also cultural tendencies.

Instructions: Use any kind of cooking ingredient with a distinctive flavour or taste, using as many flavours as you need groups. Salt, hot red peppers etc. Put them in the areas where the groups will work and then, ask class members to go to their favorite flavour.

Variations: Alternatively, divide the group by having participants choose their favourite fruit or choose their favourite dish from several common dishes. Or, have a real snack at each location, and see where people gravitate. Depending on the context, this could be a good time to use international and ethnic snack foods.

Once the small groups are formed, ask people to take a look around.
• Do they see themes in the groupings?
• Any cultural tendencies?
• Do they see reinforcement, that we all have our individual taste preferences?
• Ask people to reflect on why they like the taste they chose.
• What life experiences taught them to value that taste?
• Might this enhance their cultural self-awareness?

https://blog.culturaldetective.com/2013/06/18/10-surefire-ways-to-divide-into-groups

Each group then discusses the following topics, written on the board, and records the answers. Then they present to all the skills they need to learn.

1) How do you hope this program will help you?

2) Provide details of any qualifications you have (whether they are attending school, college, university, or related to 33 training projects, or have been acquired empirically).

3) Indicate the skills that you believe you need to learn in order to help you become a member of the community.

These answers help the facilitator understand the participants more and adjust the approach used to their needs and skills.

• Learning the words of the materials and the basic culinary terminology in the host country language.

• Create simple written materials such as glossaries, which can be added to by participants during the workshops.

It will be of great use for all the participants to have a glossary note book from the beginning which they can revise as the sessions continue.

• The seasonal raw materials of the host country are highlighted with an emphasis on cheap products with complete nutritional value.

• Definition of basic rules of nutritious diet, importance of seasonality of raw materials of the host country.

Talk about differences in nutritional needs that are also consistent with the climate and the raw materials found in the host country relative to those of the country of origin.

Pinpoint the health problems that might arise if this is not taken into account.

The information needed is found in the appendices. A chart with the different countries made by the facilitator where the nutritional needs, when living in each country, are recorded, could be helpful to the participants to identify and record similarities and differences in order to create a weekly menu and realise the health problems that might arise if climate and seasonality are not taken into account. Short videos or slideshows can be used about the health problems mentioned.

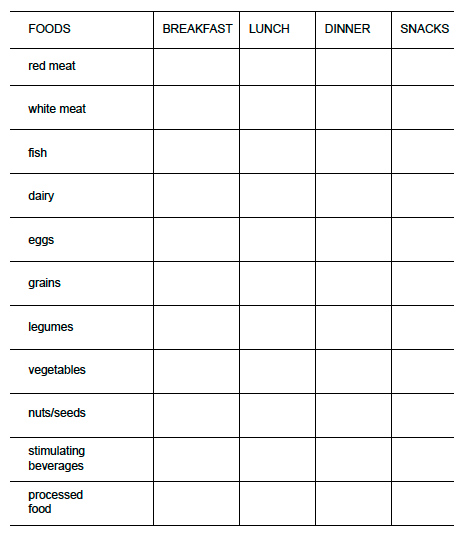
Each participant writes down one’s own weekly menu recording how many times per week one eats each food category.

Game: Love/hate

Participants make a list of the 5 things they love most and another of the 5 things they hate most regarding food, which they then read out to other members of the group.

Participants have to use their voice to express the sentiment they feel toward the objects in question.

The lists may contain the most diverse set of things (a certain feeling, a quality, an ingredient, a dish etc.). With the help of this exercise a list can be created, the elements of which may even suggest ideas for eventual stories, and the trainer can help elaborate the details.

The exercise helps create group cohesion and at the same time is an effective way to prepare for the recording of the storytelling during which participants will also have to convey sentiments and emotional tensions with their voice.

The game is based on the method developed by “i-DIGital Stories – Stories Educational Learning Facilities” project, with the financial assistance of the Erasmus + program of the European Commission.

Then each small group creates a weekly menu using the new knowledge already given about a healthy, nutritious diet taking into consideration economical and religious factors.

Suggestions about the “ideal” menu are given in an appendix and they could be used as a base to create the menu which will satisfy the needs of the people each facilitator works with.

Record new vegetables originating in the countries of origin that could be grown in the host country and give a sense of home (taking into account the climate). Locals talk about the seasonal raw materials of their country. A discussion about similar vegetables is taking place and the ways they are used in each cuisine.

Talk about foraged food

The facilitators can decide whether doing or not this activity.

If so they could consult a horticulturist.

Blindfolded tasting of foraged greens, vegetables or herbs cooked or raw.

Each facilitator will decide whether or not to do this.

Community supported agriculture:

examine and create the conditions to develop or join community gardens in the reception areas or other available spaces with the participation of local groups already active in them.

The facilitators explain to the group the importance of creating or joining community gardens as this can be a solution to eating cheaply and using fresh, highly nutritional products. It is also a good way for newcomers to become part of a group with local residents in a useful, creative way for the whole community.

Community Supported Agriculture consists of a community of individuals who pledge support to a farm operation so that the farmland becomes, either legally or spiritually, the community’s farm, with the growers and consumers providing mutual support and sharing the risks and benefits of food production. Typically, members or “share-holders” of the farm or garden pledge in advance to cover the anticipated costs of the farm operation and farmer’s salary. In return, they receive shares in the farm’s bounty throughout the growing season, as well as satisfaction gained from reconnecting to the land and participating directly in food production. Members also 35 share in the risks of farming, including poor harvests due to unfavorable weather or pests. By direct sales to community members, who have provided the farmer with working capital in advance, growers receive better prices for their crops, gain some financial security, and are relieved of much of the burden of marketing.

This information could be given by using a short film or by inviting a person who is working in a community supported farm or garden.
Since the members of the groups do not usually have the financial ability to become “share-holders” the possibility of offering work instead of money is probed.
This means that the instructor should have found the CSA farms or gardens in the area or should have contacted collegialities which could help. If there is no such farm or garden in our place we discuss with the group the possibility to find a place to start one. It is not a goal of this workshop to organize this but it is important to give the participants the initiative if they are interested in doing so.

4.3 Session 3

The overall goals of the 3rd session are:

• Handle more effectively one’s domestic budget by shopping for cheap but nutritious food ingredients and prepare healthy homemade food
• Learn how to cook tasty and nutritious meals by using the best of local and seasonal produce, herbs and spices
• Combine cooking ways of all cooking traditions and gain a deeper understanding of the host country cuisine
• Prepare and share a meal together by integrating the best of what local and newcomers bring to the table
• Share experiences and skills
• Have fun cooking and eating together

Repeat the names of the participants using a simple game. Use a small ball which is tossed to each other. The person catching the ball has to say the name of the person who tossed it to him or her. Do this faster and faster.

Create 3 groups of 4 persons. All work is done in the groups and then presented and discussed by all

Divide the teams using a card game (vegetables, pulses, grains).

Four vegetable cards, four grain cards etc are handed out to the group so as to form smaller groups. Take into consideration that in each group people from different countries should participate in order to achieve the intended result.

The necessary changes must also be made so that a local person joins each group in order to help the group fulfil the goal of the workshop as this person instinctively knows what the local cuisine really is.

Review the food glossaries

Do so by using a simple card game.

Using as a basis the three food categories which have already been mentioned (vegetables, pulses, grains) three groups of four persons are formed. Each person in each sub-group records two dishes from each food category (one that needs cooking and one that does not) from all countries. This encourages conversation about memories and helps participants adjust the raw materials needed for the dish to 36 the ingredients found in the host country.

The facilitator makes suggestions that leads them to focus on the same dominant ingredient for each dish, or can ask from the beginning each group to work on a specific vegetable, grain or legume. In this way the activity is more structured and controlled. The participants could be asked to think about dishes based only on the available ingredients.

An example will clear things up. Let’s say that one group of four who come from four different countries, works on vegetables. They start talking about vegetable dishes cooked or not.

The facilitators’ comments lead the locals to help the newcomers change the ingredients that are either expensive or out of season and to focus on recording dishes about the same vegetable.

Eventually, we have four dishes that need cooking and four that do not, two from each country, coming from each group.

Find again similarities and differences, which due to the “recipes”, become more specific. Work in the small groups first and then all together.

Compare raw materials and cooking ways, and herbs and spices used. When the dish is served (as a side or main dish etc). Make notes on the board.

Then each group modifies all four dishes that need cooking in one that follows the cooking ways and the philosophy of the cuisine of the host country. They do the same with the four dishes that do not need cooking.

In the end, we have three dishes that need cooking and three that do not, six in total from all groups. The local person in each group leads the rest of the participants in the group with the help of the facilitator. It is the local person’s “taste” of the traditional dishes of their region that helps them all modify the dishes.

The philosophy and available seasonal materials of the host country should be highlighted in order to help the group create the new dishes.

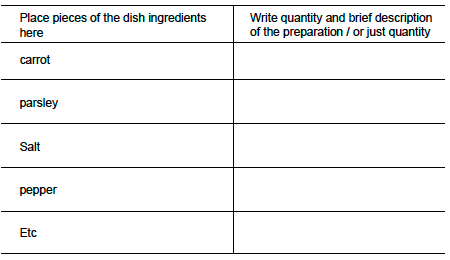
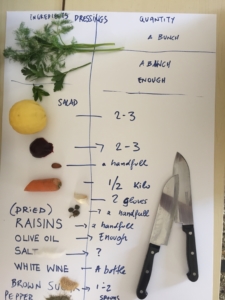
Each group records the new dishes by making a “recipe board” for each one.

By looking at the “board” we have the recipe of the dish in a simple creative way that provides an opportunity for the facilitator to ask the group to make the necessary changes so that the dish is balanced. In this way, this can be done easily and quickly. An A5 or bigger paper can be used for each board. The facilitator asks each group to make a list of the ingredients needed for both dishes and to hand them over.

The facilitator records the recipes taking photos of each “board”. The lists are needed to help the facilitator do the shopping for the cooking in the next session.

Game: The game of unrelated words

In this game participants have to make up a story from unrelated words. Each participant in each group writes down, draws or says out loud a word that comes to mind. They should use five words from the ingredients used in their dish and four from the words that came to their minds. The trainer collects the words from each group and writes them on the board so that everyone can see all the words.

Words from the first group Words from the second group Words from the third group Words from the fourth group

Then each group writes a coherent story, using all the words on the board. Each participant contributes to this by writing a sentence working in a sequence. They finish when they decide that the story is complete. The quality of the stories is unimportant; the more surreal or far-fetched a story, the more interesting. This exercise greatly helps in making participants more relaxed, and at the same time demonstrates the different characteristics of a short story of this genre (length, structure, simplicity).

Example: Our stories since more words are about ingredients are more focused on food.

Words: apple, glasses, clock, long, car, pink, wood, shoe.

Mrs Wood glanced at the clock and was relieved to see that she only had another ten minutes before the school bell rang. She was eager to eat the pink lady apple that she had found rolling around in the back of her car along with the shoe she’d lost earlier in the week and her purse that unfortunately had no money in it. She looked at the apple and wondered how long it had been there for. She was starving and with no money had little choice but to eat it. “Perhaps the time has come for a trip to the opticians” she said to herself, “maybe I need glasses”.

The game is based on the method developed by “i-DIGital Stories – Stories Educational Learning Facilities” project, with the financial assistance of the Erasmus + program of the European Commission.

Examine if each “recipe” follows the basic rules of nutritional diet presented in the second session and make the necessary changes.

There is an appendix on basic rules of nutritional diet which can be used as a guide to help the group establish the changes that should ideally be made and which of them are attainable because of economic or other reasons.

This is done first by each group and then all together.

We only prepare dishes that do not need cooking based on the available ingredients. Because of that some adaptations to the “recipes” might be needed.

We have already provided seasonal vegetables, fruits, herbs and spices. Sugar, honey, vinegar, oils etc. If pulses and grains are to be used they should be cooked in advance.

Detailed information has been given on how to prepare the workshop “kitchen”, the raw materials and the equipment needed.

An appendix about food safety is also attached.

Eat all together, clean the cooking area and do the washing up.

4.4 Session 4

The overall goals of the 4th session are:

• Increase health levels by learning about the properties and uses of herbs and spices
• Apply basic skills in nutritional diet
• Review the words of raw materials and basic culinary terminology and create a glossary about herbs and spices
• Through participants’ contribution and acceptance in the multicultural team they increase their self-esteem by appreciating their own cultural background and they establish a more solid identity developing social and individual creativity
• Exchange culinary knowledge in order to increase selfrespect and respect for others
• Combine cooking ways of all cooking traditions and gain a deeper understanding of the newcomers traditional cuisines
• Prepare and share a meal together
• Prepare for the digital story sessions as most of the activities have a strong emotional aspect encouraging the participants to share more about themselves

Begin by cooking the final recipes from the previous workshop that need cooking.

All the necessary raw materials for the dishes are available, as the “recipes” were provided at the previous session. Work with the same small groups that created each dish. As they start talking and preparing for cooking they may decide that adjustments and changes should be made to make the dish really tasty. Store the food.

After cooking, form different groups using an easy game.

In a bag, there are four different kinds of herbs or spices or both, as many pieces of each as the number of persons in the group.

For example, four pieces of sage, four cinnamon sticks etc and we ask each one to choose one without looking at them. Those holding the same item form a group. We have three groups of four persons each.

Game: Childhood memories

The trainer asks participants in each small group to think of a very much loved, desired or even very much hated childhood dish of theirs. If everyone has found the object in question among their memories, we ask them to tell a short story connected to that dish.

This exercise can evoke many stories from storytellers. If we place the story into childhood, storytellers will often open up more easily and let others in on the details of their lives. This exercise may reveal a personality who used to be a rebel, a passive, an exploring or a leading personality.

Example:

I liked many different types of food when I was a child, but the one dish that stands out among them in my memory is undoubtedly the home-made lasagna that my mother’s friend Elisa made. Elisa was from the northern part of Italy, and her cooking was allround outstanding. But the lasagna she prepared was exceptional, at least in my memory.

I used to spend quite a lot of time in her kitchen, as her daughter Luciana was my best friend. So, it’s not only the dish itself I have kept as a precious memory, but the whole context: my closeness to Luciana, the atmosphere of her house and the many times we were present when Elisa prepared meals. Of course, the lasagna was made from scratch. I remember vividly how that dough was rolled onto a very large wooden board so as to form a big rectangle, which would then be cut into several smaller rectangles to later create alternate layers in the dish. Very often, we children were encouraged to roll out the dough with the long thin rolling pin ourselves – a lot of small-arm strength was required to do this, and the task was invariably finished by Elisa.

When the rolling out was done, Elisa would transfer the board with the dough to a cool place where it was left to dry. This was not a dish to be eaten the day of its preparation! We had to wait and I remember the excitement when at last I was again invited, this time for dinner, and the delicious preparation was served: fresh pasta with the most exquisite filling of ground meat, ripe tomatoes and herbs…

Needless to say, I have never since eaten such wonderful lasagna. (Written by Nancy Katsigiannis)

The game is based on the method developed by “i-DIGital Stories – Stories Educational Learning Facilities” project, with the financial assistance of the Erasmus + program of the European Commission. All share their stories and then each person in the group chooses:

• One herb and one spice, that one thinks represents the cuisine of one’s country of origin.

• One herb and one spice, that when used tastes, smells or “feels like home”.

We want this to happen spontaneously, so do not give further explanation, even if asked to do so. If there is a language issue provide a simpler explanation.

Discussion in the group and presentation by all groups Talk about the use of spices and herbs in every culinary tradition, using as a basis the dishes of the previous day. Point out similarities and differences in the way raw materials are combined with spices and herbs and in the ways spices and herbs are cooked. Test by eating and smelling some spices and herbs.

We can do that  blindfolded as a game.

Make a list on the board and a glossary of the herbs and spices mentioned. Participants also write the words in their notebooks.

Facilitators have already prepared images in the presentation or on cards of the main herbs and spices each cuisine uses.

Talk about “famous” spice mixtures. Ask the participants for recipes and prepare some to use in the cooking.

Examples of some mixtures

• garlic, ginger paste

• garam masala

• ras el hanout

Recipes are easily found online. Be prepared and have available all the spices needed.

• Properties of common herbs and spices and their importance for our health.
Best ways to use them • Use of raw salt and unrefined sugar.
• Explain how ingredients with relatively low nutritional value, change by adding herbs and spices which transform their value and health benefits. Appendixes on each topic

Based on the herbs and spices already selected by the participants ask each person to record (working in the same three groups of four persons)

Two dishes of vegetables, pulses or grains from their country in which the herb they came down in favor of is “dominant”. Then choose those with the greatest emotional value.

Ask each group to work on one of the food categories. There should be at least four dishes from each group, twelve in total.

Ask each group to select one dish that needs cooking and one that does not from the host country using wherever possible the same ingredients, especially the same herbs or spices with those already chosen.

As a result, there are six dishes.

To do so use as many cookbooks about the host country cuisine as the number of groups. Find easy to read books with simple recipes. Give one to each group and using the glossaries produced they choose the recipes they need to work with. The locals again will help.

Each group modifies the recipes selected from the cookbooks into recipes compatible with the culinary ways of the countries newcomers come from in order to have six new dishes.

The facilitator has already done this to one recipe which they use as an example if necessary. Newcomers instinctively know which modifications to make so that the new dish pleases their taste, so we just “follow” them. Help them understand that “food can be a source of pleasure or a memory from our past but often is a leap into the unknown as we try things for the first time”.

Each group again uses the “recipe board” as in the previous session to record the new dishes.

Check for nutritional completeness and make any necessary changes according to the seasonality of materials. The facilitator asks each group to make a list of the ingredients needed for both dishes and hand them over.

The facilitator records the recipes taking photos of each “board”. The lists are needed to help the facilitator purchase the shopping for the cooking in the next session.

Question to be processed to the next meeting

Can herbs and spices help us understand each other better, come closer, accept and respect one another regardless of our different backgrounds, transforming the differences of each culinary tradition into mutual acceptance?

Hand that written to each participant and ask one to read it out. Then ask them to reflect on it until the next meeting.

Close the workshop by eating together, clean the space and do the washing up.

4.5 Session 5

The overall goals of the 5th session are:

• Exchange culinary knowledge and combine cooking ways of all cooking traditions

• Recognise their skills and their knowledge and harness this to build better relationships and stronger communities by preparing and sharing a meal together through improvisation

• Realise that one can eat well without it costing much

Start by playing a game. Have printed photos of the cooking process from the previous workshop. Mix them and ask the group to arrange them in the correct sequence.

Prepare the final dishes from the previous workshop. Each facilitator decides whether to prepare the dishes that need cooking or the dishes that do
not need cooking, or a combination of both.

Work with the small groups from the previous session which created the recipes.

After cooking is finished each group creates a new dish (by improvising) using the available ingredients. Vegetables, grains, herbs and spices the facilitators have already provided. We ask one group to create a dish that needs cooking and we ask the other two to make something that does not need cooking.

Each group examines

• if the dish is in accordance with the principles of healthy eating, how full of nutrition it is, how affordable it is

• if it has integrated as many culinary ways as possible from all the participants’ countries using herbs and spices. Make changes if needed and prepare some or all the dishes.

Answer the question raised in the previous workshop.

Can herbs and spices help us understand each other better, come closer, accept and respect one another regardless of our different backgrounds, transforming the differences of each culinary tradition into mutual acceptance? In the small groups first and then all together, discuss the answers, setting the basis for creating the digital stories using the following game.

Game: Let’s play with fire

We can change the game if needed as fire might bring about traumatic memories. In this case, we could use a sand timer. The essence of the game is a concentrated, pure narration, a composed message created in a short time. Participants have 10 minutes to prepare their stories and then talk about their experience during the seminar.

This can be about the activities, the knowledge, the people, the sentiments, or anything which the storyteller has a strong feeling towards. Then participants can tell their stories with a burning match in their hand: they have to finish the story before the match burns out. The goal is to tell a story in a concentrated and concise way, with an eye on the flame of the match at the same time. If the match burns out or is extinguished before the story ends, the storyteller must stop the narration. The burning match helps to concentrate on the essence and to narrate the story in a straightforward manner. Attention: The trainer must be aware of fire safety, and make sure not to trigger a fire-alarm system in the room with the smoke from the match. Storytellers should have a glass of water in front of themselves in order to be able to drop the match in to the glass before it burns their fingers. It is best to use long matches, as suitable for gas ovens. Never use this activity with children.

The game is based on the method developed by “i-DIGital Stories – Stories Educational Learning Facilities” project, with the financial assistance of the Erasmus + program of the European Commission.

Ask the participants to evaluate the seminar by answering these three simple questions.

• One thing you have learned • One thing you will do differently

• One thing you will share We close the cooking part of the seminar sharing a big table with all the prepared dishes, drinks and music.

We clean the space and do the washing up.

4.6 Session 6

The sixth and final session is dedicated to digital storytelling. This session is intended to be a further development and a transfer of the praxis which were developed within the project “i-DIGital Stories, Stories Educational Learning Facilities”, which was implemented by some of the Healthnic partners with the financial assistance of the Erasmus + program of the European Commission.

For a more complete overview of the references on digital storytelling, the facilitator should deepen the theoretical and practical aspect of this approach by consulting the Guide “Digital Storytelling in Practice, training manual for digital storytelling workshops”.

[1] Bán D., Nagy B., Digital Storytelling in Practice, training manual for digital storytelling workshops, output of the “i-DIGital Stories – Stories Educational Learning Facilities” financed by the European Commission n. 2015-1-IT02-KA204-015181, English version: http://idigstories.eu/wpcontent/ uploads/2016/09/Digital_Storytelling_in_Practice.pdf, available in Italian, Hungarian, Greek and Polish on www.idigstories.eu

4.6.1 Introduction

The goals of the sixth session are dedicated to digital storytelling and focused towards a process of further development and sharing the experience of the participants.

The process that participants will follow encourage the deepening of the emotional dimension of the participants, in order to regain, enlighten and share part of the heritage of the participants. At the same time, the process allows participants to gain new skills in the following issues:

• Self-awareness, within the group session which favour a gentle recall of personal dimensions

• Narrative, with the implementation of their own story to become digitalised

• IT, with the digitalisation of pictures, the creation of the storyboard, the process of video and audio editing

Process and steps of the 6th session.

In order to favour a successful digital storytelling experience, the facilitator should consider the possibility that the participants are totally or partially unaware of what the digital storytelling process requires, so it is important to keep the following structure as a basis:

• Present the elements of digital storytelling

• Describe the process and the timetable in clear terms (e.g., when to select the photos, when to write the narration)

• Explain basic legal and copyright questions Outline the end of the process and the afterlife of the films (saving, publishing, creator’s right of disposal)

In this part, the participants should get acquainted with the concept and methodology of digital storytelling, the framework of the stories, the process of the digital production and watch a few sample films (even though they may have seen some at the beginning of the project).

It is important that all questions are answered, all fears, reservations, and negative feelings about the process are dissipated.

Very Important: The facilitator has to be experienced in coordinating group-sessions in order to be able to face and cope with the different dynamics that might arise from the participants during the various steps of the working process. Each group of participants has their own dynamics. The digital storytelling workshop is the final workshop of the Healthnic project and as such all the different dynamics should be revealed.

However some very powerful dynamics may arise when participants get in touch with their emotional memories. It is fundamental for the facilitator to be ready for the unexpected, and be able to cope with that.

A suggestion is to always adopt a precautionary approach. As the facilitator is not a qualified psychologist and/or psychotherapist, it must be made clear to the group at the start of the working session, that the digital storytelling session may create an emotional reaction, but this is not a therapeutic framework, nor a therapeutic group experience. It is up to the facilitator’s competence, qualification and responsibility to deal with any emotional dynamics which might arise during the process.

That is why it is up to the facilitator to decide if the participants are going to work in groups or as individuals to produce their digital stories, judging what is best for them and for the working program.

4.6.2 The storytelling circle

After clarification of the group agreement, the facilitator should open the working sessions by proposing some activation and ice-breaking activities:

• Warm up the participants and have them ready to begin writing their stories.

• Create trust so that the participants can open up and find their story by trusting and inspiring one another.

• Work on the draft of their story from which they will ultimately create the narrative of the film. The process of writing begins with the story circle.

The 44 facilitator should use of one digital storytelling game.

The word “game” should be used with caution when introducing the story circle because it can be scary, intimidating or even alienating for some. If an atmosphere of trust has already been created between participants, games can be talked about more freely.

Game: Personal photo / item / ingredient

Photos, ingredients or special items are personal objects and people interpret them in a very personal way.

It can be very instructive if storytellers bring an especially important ‘object’ with them to the workshop, and then swap with another group member, thus ending up with a new and unknown object in their hands.

Each participant has to make up a story that they think is connected to the unknown object. After everyone has described the object and told the story they made up, they are returned to the owners, who then tell the real story.

This is an interesting exercise to illustrate how the same object can be approached in different ways. It also provides the participants with an opportunity to let their imaginations run loose, and thus start to think of a personal story they want to tell.

Especially in this part of the process, emotional content might arise out of the process of memoryrecall. Due to the personal stories of the participants, these emotions may be particularly strong and important.

One recommendation for the facilitator pay attention exercise due care during these moments, in order to guarantee that everyone is protected and respected through any emotional flow. Remember, it is down to facilitator’s competence, qualifications and responsibility to deal with and take care of any emotional dynamics and content.

By the end of the circle, ideally all participants should find the stories they want to tell so that they can elaborate on the writing and recording steps of the workshop.

There are some basic principles and rules which the facilitator has to follow, and to repeat as necessary, in order to support a climate of protection within the group. The basic principles of the storytelling circle are the following:

• each and every participant should play an active part, including the facilitator and technical support members (if there are any)

• nobody should feel the need to be sorry or apologize if there is something they do not understand, or is beyond their ability or confidence

• the essence of the story circle is trust: whatever is said there cannot leave the room

• participants do not judge each other or each other’s work.

4.6.3 The writing

The writing part is usually expected to be the easier part of the working session, however due to the variety of experiences from the participants, it is not as easy as it might appear.

This part allows participants to implement and practice the following competences:

• Learning how to express thoughts in a cohesive and well structured manner and put them down in words.

• Learning useful tips about story writing.

• Learning how to write a short story.

• A simple but clear script has to be finished by the end 45 of this step, which the participant will read out at the recording phase.

By the end of the story circle all the participants should reach the point where they are ready to decide on the story they want to tell, and in an ideal case they also prepare a first written draft. After making the necessary modifications and – if necessary – consulting with the facilitator, the final and typewritten story is ready to be read out.

Those who have problems with reading or don’t feel comfortable with it, can tell their story directly to the trainer.

The Script

For the script it is best to think in simple, short sentences, taking care of using expressions and idioms characteristic of those writing it. The text should be between one hundred and eighty and three hundred and twenty words. It is worthwhile reading the text aloud before finalising it so as to understand the length of the final film, which should be roughly two minutes. Everyone should be allowed to spend the necessary time to develop their story

If possible, the workshop should be organised so that participants are able to sleep on their story before finalising it. After all the participants are using digital methods to tell their personal stories, and that should be the most important aspect of the Digital Storytelling workshop.

The trainer should help not only those who are experiencing difficulties with their stories however, the trainer should also assist those who are overconfident. Some people may be sure of their work, of their stories on paper, but often their written stories are not well thought out or sincere enough. In such cases, as with participants who are experiencing difficulties, the best way to help is by asking purposeful and relevant questions to fine-tune the stories in a way that does not directly interfere with the writings.

Useful tips for the storywriting.

How to start:

• Do not sit looking at a blank sheet. Give yourself a time limit and just write. Do not judge at the beginning.

• Remember that spoken words are only heard once, in contrast to the written word which can be re-examined. Clarity is important. Avoid repetition unless it is deliberate.

• Find other words. Do not use literary expressions or connecting phrases like “as I mentioned before”. They will jar on the ear.

• Find your own voice. Do not imitate. Be aware of how you like to use words and have the confidence to use your own idioms.

• Picture what you are writing about in as much detail as possible – feelings, colours, textures, smells. This will influence how you write.

• You do not have lots of words so plunge in. There is no need to tell the story in a linear way, even though it will require a beginning, middle and end. Find what is most arresting and start there. It may be from any point in your narrative. • Do not get too attached to the exact facts. Do not let them get in the way of the truth.

[4] Recommendations of Gilly Adams, director of the BBC’s writer development unit at BBC Wales, for getting the story down on paper.

Refining and completing the story:

• Try your story on others and get feedback. What works and what does not? Are you being clear? Have you left out something important that was there originally?

• Less is more. Expect to rewrite and rewrite. Edit rigorously. What is the essence of your story? Attempt to express that in one sentence. Now make sure that you have nothing unnecessary. Does everything move the story on?

• Avoid cliché and banal sentiments. Look for a fresh form of words.

• Generalities are lazy and close things down. The specific, well observed detail is what will resonate.

• A story needs structure. The end needs to have some connection with the beginning to be satisfying. Think of stepping stones. When you reach the other bank of the river you should still be able to see the bank from which you started your journey.

• And the stepping stones are important. They are the steps that build the story. Make sure you have not missed a vital step out.

• Treat your story with respect, as though it were the best story in the world.

4.6.4 The recording

Goals

• Preparing all the necessary elements in order to make the film.

• Learning the basics of voice recording.

• Researching for photos and videos on the web – good practises.

The voice recording

The technical part of digital storytelling begins with the voice recording.

Both the technical quality and the “subjective feel” of the recorded voice are crucial for the success of digital storytelling. The trainer should make sure to find an appropriate venue for the reading out and recording of the stories.

In order to find the right venue for the voice recording it is worth knowing a few practical tricks. Try to find a room where the furniture consists of soft, upholstered armchairs and seats, where there is wall-to-wall carpet and many curtains, if possible. These can help a lot in absorbing the echo. Test the room by clapping and listening to the echo being absorbed. If clapping does not echo at all, the result is perfect. Exclude external noises as much as possible and make sure there is no noisy street, crowded footpath, corridor or electric devices in standby mode nearby, or an elevator next door. Everything which is audible for the human ear will be audible on the sound recording too, diminishing the audibility of the narration. If the text is not recorded in the proper circumstances, it can ruin the whole film. If there is no other option, a fairly good recording can be made even inside a car if parked in a quiet place with all the doors and windows closed. In any case, always make a test recording before the actual recording of the voiceover in order to verify its clarity and quality.

During recording time, mobile phones should be completely switched off (mute is not enough as the radio waves generated by the phones may interfere with our recording) and placed as far away from the voice recorder as possible. Or even better, do not bring them in the room at all if possible. The voice recorder should be placed in the farthest position away from all kinds of electromagnetic devices (switched-on computer, telephone, radio, modem, etc.), because they – just like mobiles – can have noise inaudible to the human ear but very much audible in the recording.

The facilitator makes sure the text is followed and draws the participants’ attention to any mistakes. It is not a problem if the storyteller cannot read the text without mistakes in one sitting. This is not the point, as mistakes can be easily corrected during the edit.

To correct mistakes the wrong sentence or paragraph should be repeated, otherwise there may be a leap in the text during the audio editing. It is always best to mark the parts with mistakes on paper, this will provide a reminder of where to make the correction when editing the recording.

The facilitator also follows the text with an “external ear” and may help to adapt the text better to the personality of the storyteller and the mood of the story.

For everyday people reading out a text and recording it can be a challenge. People generally do not like to hear their own voices played back, which may sound strange from outside. If there is dissatisfaction with the recording, do not hesitate to make several versions until our own voice is found.

A basic rule of recording is to make at least two recordings of the complete text.

Image recording (digitising, taking photographs) The recording phase includes the digitising of photos (drawings, figures, etc.), and the taking of new photographs if necessary. Part of the pictures used for the digital storytelling process can be paper prints; these have to be scanned for digital/ computer usage. Photos made with a digital camera or downloaded from the internet or social media sites can also be used for the storytelling.

When using them, there are two important aspects to consider: the size and resolution of the picture and the question of copyright. Avoid using pictures taken by a third party – not ourselves or someone we know – as much as possible. If our story requires that we complement our short film with photos downloaded from the internet, it must be checked that they are free to use (cc- creative commons, copyright free) and do not have any recognisable people on them. If photos from social media sites are needed, only use those that are connected to us or to people we know, but before they are publicly shared permission must be obtained from the persons concerned. In the case of photos downloaded from the internet or photos taken or scanned, ensure they are of a high resolution (at least 1280×720 pixels, 300 dpi; JPEG or TIFF format).

To illustrate a two-minute short film, using fifteen to twenty photos is recommended – if less are used, the pace of the story will become too slow, if we use more, it will be too rapid and hasty. It is therefore important to choose the right amount from the photos available.

Video clips, music

There are digital storytelling movies where it is possible to use video clips, music and other effects to produce the film. Their use is justified only in cases when the element in question is closely connected to the story and enhances its message or its understanding. In the editing process, the trainer has to deal with all three elements carefully so that they do not divert viewers’ attention from the story. The volume of the music and the effects should not kill the storyteller’s voice and it should not hamper intelligibility and the general effect of the movie. An ill-chosen or not rightly set (sound-mixed) effect or clip weakens the strength of the movie, can ruin dramaturgically high points, and in extreme cases can even discredit the message.

Whenever using outside material – video clips, music, special effects – copyright should also be taken into consideration. Any music, effect or video clip which is not made by us, does not belong to the public domain and is not Creative Commons (copyright free), is bound to copyright and/or permission.

4.6.4.1 The storyboard

When all the writing process comes to its end, it is the time to transfer it into the storyboard, which will represent the basis for the audio and video editing. This process is based on:

• The participants will decide in which order to put all the elements they have created / gathered in order to tell their story and make their film.

• Learning what is a storyboard and how it is useful. (It has already been used in the previous workshops without knowing it).

• Combining words with pictures. • Learning the importance of visual communication.

It can be very helpful for the participants to make a storyboard, based on their script and photos. This is a simple two-column table, one column of which has the text divided according to a certain rhythm

• usually sentence by sentence, paired with the appropriate photos in the other column.

This format can be achieved through computer software or even with pen and paper. Any medium can be used as long as the participants can match their story with their chosen photos. Whatever the facilitator believes is easier for the participants. In the appendix you can find a script and storyboard as an example.

The storyboard makes the proportion of pictures vs. the text in the story visible. When picturing and drafting their story participants often miscalculate the amount of necessary and available pictures, but after finishing the storyboard it becomes clear whether there are enough photos for the whole length of the film and whether they are distributed proportionately, according to their dramatic weight.

In general, a few sentences is generally the right amount of text for one photo, thus allowing for an evenly-paced, easy to follow film to be made. Of course, there can be deviations from this guideline if the emotional rhythm and the dramaturgy of the film make it necessary.

The storyboard stage is optional however it can assist participants visualise their story prior to editing, thus making it easier to make any changes without having to navigate through a new software.

4.6.5 Editing

The editing part of the session is dedicated to implementing the IT skills of the participants, as it allows to increase:

• Learning basic sound, image and video editing skills.

• Acquiring basic ICT skills by using the chosen editing software.

• Creating a short film telling a personal story.

• Gaining a sense of fulfilment by creating a film. In order to make digital stories, completing several editing steps is required:

• The recorded sound has to be gapped and mistakes and stops removed, after which the voiceover is completed, giving the backbone of the story

• Images have to be edited, if necessary (e.g. cut to size, set the contrast ratio, etc.)

• The edited and cleansed voiceover, the photos adjusted to it and the opening title together make up the edited digital story.

The film can be made by the facilitator based on the storyboard with the collaboration of the storyteller, however after learning the basic skills of the editing process participants may be able to make their own digital stories.

There are quite a few editing software applications on the market with versions that are often updated or changed, and also because different programs have
to be used for PC and MAC computers, the present manual does not wish to provide specific technical aid.
There are readily available free audio and video editing software applications, which  however are not always compatible with each other, or the editing of the voiceover and the gapping of the images requires separate processes. There are also editing systems accessible on-line, which however require broadband internet access throughout the work process.
Complex editing software programs installed on the computer can also be used, which – despite being rather complicated – usually offer a handy solution for making short films.
The use of software depends on the technical background of participants or the training place.
(If there are enough computers, the training place can provide the technical capacity needed.)
Consequently, the technical means and approaches of editing and producing the films depend on the software used, as well as the facilitator and the storytellers. Here are a few pieces of general advice and some guidelines.

• The facilitator must be familiar with the given software.
• At the beginning of the workshop the technical status of all the computers to be used in the editing has to be checked and the software has to be tested on them. -Technical preparations should not take time from editing. (It could be
done in the previous workshops by an assistant.)
• Participants have to be given a presentation of the whole editing process at the beginning of the technical training, and they have to have explained step by step how to produce their own short films with the given software.
• During the demonstration participants have to pay attention only to the facilitator; at this point they should not yet begin to try what they have heard on their computers.
• Enough time must be allowed for participants to discover the software and make the film at their own pace.
• If there is need, the facilitator should assist participants. Give them cinematographic  advice or help them in the technical fine-tuning.
• The film must have a title which appears at the opening of the film. Whether the name of the creator appears in the opening title is optional.
• It is important that pictures should have the proper resolution. Bad quality, low definition pictures destroy the general effect.
• Avoid using too many visual effects. Digital effects (the slight moving of still pictures, transitions between photos, highlighting certain details, etc.) may help in making the
story more movie-like, but should only be used use if the dramaturgy justifies it. The facilitator may give advice as to the use of digital effects, but it is basically a question of taste.
• If there is a blockage before finalizing the film, show it to someone else, preferably to the facilitator.
• Once the film is produced, it is worth saving it in good enough quality, making sure the file is not too big (the  ollowing formats are recommended: mov, mp4, mpeg, avi),
for future use, including uploading on the internet.

It is easy to underestimate the time needed for editing. Although it is basically a single technical process, creativity plays a key role in the end result.
Editing is however a rewarding and enjoyable process, such as when the short film is beginning to take shape from different elements, or when it acquires new momentum and a new meaning following a tiny change. A small adjustment in the editing can have a huge effect on the outcome.

When the editing process is finished and the film is ready, the editing software “merges” (exports) the elements together according to the specified parameters, thus producing a video file (mov, mp4, mpeg, avi, etc.), which can be presented to or shared with the public any time.

4.6.6 Sharing (private screening)

This step of the working session is dedicated to the sharing of the results. Depending on the scheduled time, this part can be done at the end of the working day, or as part of a final meeting totally dedicated to feedback, evaluation and restitution of the common experience. This part of the process is dedicated to:

• The participants share their films with each other.

• Learning how to open up and share a personal creation.

• Realising the power within oneself. If focussed – things that seems impossible at first sight become possible. (in this case the creation of a film) Digital stories are made to be shared with others, but sometimes a film can be produced whose creator does not want to share it with the broader public in the end, only with fellow participants of the workshop. As a conclusion to the process participants of the workshop show each other the finished films. The screening is the coronation of the participants’ hard work. It is a festive occasion when the storyteller steps out of the closed world of creation and stands before the others. This may be accompanied by stage-fright and anxiety.

The facilitator should strive to make the screening an event worthy of its importance. The room should be arranged in a way that the screen can be seen by everyone and blacked out if necessary. Use high-quality video and audio equipment.

The facilitator should introduce each film with a few personal words, in order to dissipate the storyteller’s discomfort and ensure that the work receives proper attention. At this stage the facilitator should abstain from any critical remarks and should not give other particpants the opportunity to do so. All the participants should be present at the screening.

4.6.7 Debriefing

This final step is as important as the first, because a clear and honest closure of the session will allow participants to value their efforts and empower the lesson-learnt. During this step it is important for the facilitator to share also its emotional part together with the feedback and restitution of the whole work that was done. The important moments include:

• Discussing the process of the seminar (both the cooking and digital storytelling workshops)

• Sharing the experience of the process

• Make clear future uses of the created films

The closing of the digital storytelling workshop is a short group discussion when each participant gives feedback to the group and the facilitator on the whole process. This is the time to share personal experiences, not so much to talk about the finished films; and criticism of them is absolutely out of the question.

In the closing circle each participant should say something, including facilitator and assistants. To encourage participants to speak up, they can be asked to tell:

• One thing they have learned.

• One thing they would do differently.

• One thing they would share.

During the debriefing, the future of the films should be made clear.

The finished film is the intellectual property of its maker and in the future it can only be used with their – preferably written – permission (ANNEX). It is the filmmaker who decides about the audience the film will be available to. This may range from complete refusal through to partial permission (when the film is made available for a limited audience e.g. for educational purposes), to permission for the widest possible audience (complete availability for everyone through the internet).

The facilitator should reassure the participants that they can change or revoke their written permission any time.

This means they can give permission later to publish their film on the internet or may request its removal from the worldwide public domain (e.g. from a website managed by the facilitator). After the final debriefing step, there could be an optional public screening if the participants agree to it. The facilitator should ask the permission of the participants to screen their films publicly. That way other people (family, friends, etc.) can watch the films and learn about the participants experience and the project.

4.6.8 Public Screening

This step is totally optional, and it depends basically on two conditions: the given or not-given approval of participants to share their digital storytelling videos, and the opportunity to show the videos publicly. In the case of the facilitator including this option, the goals should be:

• Sharing the joy of the Healthnic project with a larger audience.

• Spreading the acquired knowledge of a healthy multicultural diet.

• Widen the participants social circle.

• Creating a sense of belonging.

This should be a joyous event that could be accompanied with food and music. After all the Healthnic project is all about interacting in a multicultural environment and gaining cultural knowledge, awareness and understanding of each other through food.

Bibliography

-Allocca, Kevin. “Why Videos go Viral.” TED Video. 7:16. November 2011. http://www.ted.com/talks/kevin_allocca_why_videos_go_viral

-Barrett, Helen C. “How to Create Simple Digital Stories.” Accessed July 17, 2014. http://electronicportfolios.com/digistory/howto.html

-Bruner J. Actual minds, possible words. Cambridge, Massachusetts: Harvard University Press; 1988

-Carr D., Narrative and the real world: an argument for continui ty. Hist Theory 1986

-Clark MC, Standard P. The caregiving story: how the narrative approach informs caregiving burden. Iss Ment Hea Nur 1996

-Currier, Alyce. “One Nation Under Video.” Accessed July 17, 2014. http://wistia.com/blog/onenationunder-video

-Dolto Francoise, Tout est langage, éd. Gallimard, Paris, 1995

-Dolto Francoise, Une psychanalyste dans la cité. L’aventure de la Maison verte, éd. Gallimard, Paris, 2009

-Dreon Oliver. “Digital Storytelling Overview.” YouTube video, 4:56. March 27, 2010. https://www.youtube.com/watch?v=wCFj412QBgA

-Digistories. “How is a digital story made?” Accessed July 17, 2014. http://digistories.co.uk/digistories-2/how-is-a-digital-story-made/

-Digital Storytelling for Social Impact https://www.rockefellerfoundation.org/blog/digitalstorytellingsocial-impact/

-Digital Storytelling as a Social Work Tool: Learning from Ethnographic Research with Women from Refugee Backgrounds http://bjsw.oxfordjournals.org/content/early/2013/11/19/bjsw.bct184.abstract

-Elaine Lawless. Women Escaping Violence: Empowerment through Narrative. Columbia and London: University of Missouri Press, 2001

-Gergen KJ, Gergen MM. Narrative and the self relationship. Ad Exp Soc Psychol 1988

-Bán D., Nagy B., Digital Storytelling in Practice, training manual for digital storytelling workshops, output of the “i-DIGital Stories – Stories Educational Learning Facilities” project financed by the European Commission n. 2015-1-IT02-KA204-015181 – English version: http://idigstories.eu/wp-content/uploads/2016/09/Digital_Storytelling_in_Practice.pdf available in Italian, Hungarian, Greek and Polish on http://www.idigstories.eu )

-Gregory Bateson, Steps to an Ecology of Mind (1972) The message ‘this is play.’ In B.  Schaffner (Ed.), Group Processes (1956)

-Halpern, Joseph, and Alma E. Lantz. “Learning to utilize information presented over two sensory channels.” Perception & Psychophysics 16, no. 2 (1974): 321-328.

-Hétmilliárd digitális történet. Beszélgetés Joe Lamberttel [Seven billion digital stories. Interview with Joe Lambert]. Anthropolis 7.1 (2012)

-Hilliger, Laura. “Introduction to Topic #2: Digital Storytelling”. Accessed July 17, 2014. http://etmooc.org/blog/2013/02/02/introduction-to-topic-2-digital-storytelling/

-Lambert, Joe. Digital Storytelling: Capturing Lives, Creating Community. New York: Routledge, 2013

-LeeSing, A. Curtis, and Carol A. Miles. “The relative effectiveness of audio, video, and static visual

-computer-mediated presentations.” Canadian Journal of Education/Revue canadienne de l’education (1999): 212-221

-Margaret Mead, People and Places (1959; a book for young readers), Continuities in Cultural Evolution (1964), Culture and Commitment (1970)

-Mauchland, Betty. “Jimmy’s Story.” Pilgrim Projects Limited video. Last modified June 25, 2014. http://www.patientvoices.org.uk/flv/0047pv384.htm

-Microsoft. “Movie Maker” Accessed July 17, 2014. http://windows.microsoft.com/en-ca/windowslive/movie-maker

-Morales, Robert. “Youth Leaders Speak.” Vimeo video, 4:39. No date. http://silencespeaks.org/youth-leaders-speak/

-Muchmore, Michael. “Windows Movie Maker.” Accessed July 17, 2014. http://www.pcmag.com/article2/0,2817,2426904,00.asp

-Overcah Janine, Narrative research: a review of methodology and relevance to clinical practice, Crit Rev Oncol Hematol., 2003

-Sandelowski M. Telling stories: narrative approach in qualitative research. Image 1991

-Schützenberger Anne Ancelin , Aïe, mes aïeux! Liens transgénérationnels, secrets de amille, syndrome d’anniversaire, transmission des traumatismes et pratique du génosociogramme Paris, Desclée de Brouwer, 1988

-Schützenberger Anne Ancelin, The Ancestor Syndrome, Londres & New York, Routledge, 1998

-Steffen V. Life stories and the shared experience. Soc Sci Med 97. 1997

-Stivers C. Reflections on the role of personal narrative in social science. In: Diana Tiejens Meyers

-(Ed.), Feminists rethink thee Self. Boulder , CO: Westview Press; 1993 University of Mary Washington. “DS106.” Accessed July 17, 2014. http://ds106.us/

-Visser, Jasper. “How to Tell a Story that Stands out in the Digital Age?” Accessed July 17, 2014. http://themuseumofthefuture.com/2012/10/11/digital-storytelling-how-to-tell-a-story-that-standsout-in-the-digital-age/

Useful Links

-Methodological guide, toolkit and examples of digital storytelling: www.idigstories.eu

-Center for Digital Storytelling: http://www.storycenter.org/

-Anthropolis, Storycenter (Hungary): http://storycenter.hu/

-Historypin: http://www.historypin.com/

-Daniel Medaows, Photobus: http://www.photobus.co.uk/

-Breaking Barriers: http://www.breakingbarriers.org.uk/

-Cowbird: http://cowbird.com/

-Patient Voices: http://www.patientvoices.org.uk/

-Storyworks: http://www.storyworksglam.co.uk/

-Digistories: http://digistories.co.uk/

-Historiana: http://historiana.eu/

-MemOro – Bank of The Memories: http://www.memoro.org/index.php

-Queensland University of Technology, Australia: http://digitalstorytelling.ci.qut.edu.au/

-DeTales (European stories): http://detales.net/

-K-Values (Empowerment stories): http://www.kvalues.eu/

-Diamond (Digital storytelling in museums): http://www.diamondmuseums.eu/project.html

-IntegrArt (Digital stories with immigrants): http://fotomemoria.eu/integrart/?page_id=8

-X-story (Digital storytelling in schools): http://www.storycenter.hu/x-story/

-More links: http://www.freeeslmaterials.com/digital_storytelling.html

-Guide for digital storytelling: http://www.schrockguide.net/digital-storytelling.html

Click here to add your own text

19coop - The contents of this website are licensed under a Creative Commons Attribution - NonCommercial -ShareAlike 4.0 International (CC BY-NC-SA 4.0) except if otherwise noted